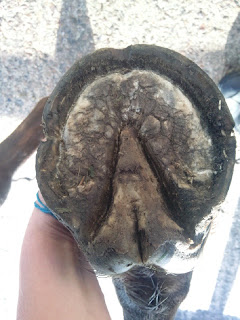

07 Sept 09 (left photo - 3) 10 Oct 09 (right photo - 4)


29 Nov 09 (left photo - 5) 23 Dec 09 (right photo - 6)


12 Feb 10

All photos are of the same foot
This foot is an ongoing case study about building concavity.
In photos 1 and 2 you can see that if the walls were trimmed to remove the flare the horse would be walking on her convex sole. But if the flare is not removed there will be a leverage action on the already stretched white line which can be incredibly painful.
The sole is flaking and ready to shed; and we don't really know what is underneath. I prefer in these circumstances to let the horse self exfoliate, but there may be times when this is not possible.
Exfoliating the sole by hand is a highly skilled job. It is important to remove what nature would take, given the chance – but avoid cutting into the hard or live sole underneath.
Excessive thinning of the sole – often associated with preparing a foot for a shoe - can lead some people to think their horse will not be suitable for barefoot. At other times an attempt is made to carve concavity into the sole.
Both of these practices will just make the horse foot sore over rough/hard ground and vulnerable to injury. However if the horse is subsequently shod, the reduction in blood supply means the horse can not feel its feet properly so is unaware of the problem.
However some horses both shod and bare will develop a tin can foot – with a deeply compacted false sole. This should be removed, but it is entirely different from paring or carving the sole. Done correctly the sole will ‘pop’ out in several large chunks.
Photo 3 - three days later the sole has exfoliated quite substantially, but there is still some way to go. You can see the sole is very flat and there is very little depth in the collateral grooves.
Photo four - one month on; there is a little more depth in the collateral grooves and the sole has cleaned up a little more.
Photos 5 and 6 – another 7 and then 4 weeks. The foot has got ‘stuck’. Even though it is winter we do not have enough control of the sugar in this horse’s diet. We start to teach her to accept soaked hay. This is unusually difficult; a) she initially hates it and b) we have weeks of snow, frozen taps and no spare water for soaking. So what should be fairly easy takes several weeks.
Photo 7 – the horse has been on properly soaked hay for one week. If you scan across the sole you can see how it is building a ‘rim’ just inside the hoof wall. Often when building concavity an early step is the hoof putting in a rim of sole that often resembles a pretend shoe.
Provided the foot/horse is correctly managed this rim should build and grow and change until we end up with a neatly concave foot. Only time will tell if I can successfully manage this horse to the next step. But I know we are on the right track because the horse has gone from being footy over stones to quite comfortable.


2 comments:
Hi there,
I just discovered your blog and have been reading back through the old posts. Love all the photos and clear explanations. I have a suggestion for a future blog post that I would love to see - something on competing horses at higher levels (e.g. eventing at novice and above) barefoot. Most people subscribe to the view that it is unsafe to jump at higher levels without shoes (and studs when conditions are bad) due to the risk of the horse slipping. Love to hear your views on that! Also, what do you think of the Strasser technique of trimming?
Thanks!
hi. my horse is just that. and sorry but I do not really understand what to do to make it better
/ / kim from Sweden (can be a bit poorly written.
I am not good in English)
Post a Comment