Custom Search
Shoes mask weaknesses, barefoot highlights strengths

Saturday 31 July 2010

More transition pictures


These pictures are not directly comparable - couple of things to note.  The first picture shows how the foot looked in shoes, but was taken 5 months ago.  The second picture shows the same foot, deshod 5.5 weeks ago.

But there are still useful/interesting observations to be made.

When shod, the front of the hoof wall was rasped heavily (probably to try and correct the deviation in the hoof angle).  You can see where the unpigmented inner hoof wall has been exposed.

The hoof deviates on the (face on) left hand or medial side.  This is a deviation not a flare as can be seen from the solar view in the previous post.  As the foot has grown down, so has the deviation.  We can only speculate as to what caused the deviation, but it is interesting that the deviation is now growing out since the shoes have been removed.  We can only wait and see if it goes entirely.

Friday 30 July 2010

By special request

The carer of this horse is working really hard to help her horse regain the feet she should have. It is not an easy journey, but they are making progress. These pictures have been posted by (their) special request.
These two solar views are 5 weeks and 4 days apart.  Progress is being made, albeit slowly.  Fortunately in this case the owner has plenty of patience.  The hoof in the first picture was pretty poorly.  The walls were very thin and crumbling and the sole, equally thin gave under thumb pressure.  There heels were small and frail.

In the second solar view, the sole is thickening up, it no longer gives under thumb pressure.  The walls are now thick enough to take a gentle roll and the heels are coming in quite nicely.

But if you draw an imaginary line horizontally across the heel bulbs - this is where you can see the real difference.  In the second photo they are plumper (a good thing).


The third and fourth photos are from the same horse. These show how the nail holes have grown out in the space of 3 months and the bull nose has dropped away.

These feet were predicted to crumble. But although progress is slow they are getting stronger all the time. Thanks to the hard work and dedication of the horse's dedicated carer.

Wednesday 28 July 2010

Bad things to do to EasyCare Boots

Ok, you try this at home at your own risk!

But this is what I do to 'help' the current model of Gloves fit my horse's wider than long hooves (in front).

The size of the problem. A 1.5 Glove is 3mm too narrow and 5-6 mm too long. Neither a size 1.0 or 2.0 work at all.

A Bare is a slightly better fit, but really I ought to go for an Old Mac (only I really dislike them. That is Really Really dislike them.) They are clumpy, go too high on the hoof and are a PITA to get on.

So as I hope the Gloves are only a temporary measure at any time I do this:-

For a new Glove fit when warm (a dunk in hot water will do the trick on cold days). Make sure hoof is freshly trimmed and that there are no unnecessary sticking out bits on the width. From the forward section of the quarter (where the hoof starts to narrow for the toe) put on a good quality duck tape. (Sorry US peeps but the stuff I got from Walmart is pants. For best effect use the 'proper' duck tape which is a tiny bit more expensive but not much.) And if the front of the boot is gaping at all then fit Power Straps. Then if you have a rasp to hand bring the breakover of the boot back a little. Enough to be effective, not so much you drastically shorten the life of the boot. (One of the reasons too long boots come off so easily is the horse can not make their natural break over so they step on the back of the fronts.)

If you have a problem with back boots coming off then double check the fit, width is important as horses often 'screw' the hind foot so the boot can twist off. If your boot fits well but there is a lot of twisting action then duck tape on the hoof wall works well. Remember use the good quality stuff that really sticks and grips.

The only problem with these measures is then getting the boots off............

Remember folks - at your own risk! :-) But it works for me most of the time.

And the moral of the story is

Don't glue your hoof boots and then fall asleep while holding the join together........

I'll let your imagination run on that one. :-)

But one reason I like the EasyCare Gloves so much is that they are relatively easy to mend. And if you insist (like idiot me) on fitting Gloves to a horse with hooves significantly wider than they are long, and who has an enormous stride then repairs are going to be needed. Regularly.

Grace my personal project has the worse metabolism I have ever encountered, basically she can not ingest anything more than 10% sugar/starch nor any 'foreign' chemicals. So boots are always on standby for footy episodes.

Despite the fitting problems I chose the Gloves because they are easy to whip on and off, the shell fits below the coronary band, they don't rub, they can cope with most of our adventures, availability is no problem, spares are easy to get and repairs are within the range of basic DIY skills.

But I so wish that EasyCare would produce the same in a range for the hoof which is wider than long. As Grace's hoof health improves the situation will only get worse not better. Mind you I am hoping that she then won't need boots at all. But still. EasyCare - hooves wider than long - Gloves to fit ASAP please :-)

In the meantime I am stocking up on glue, sewing materials and duck tape :-)

Friday 23 July 2010

Thrush busting

Previous post mentioned just how much Thrush there is around at the moment - which seems to be a common theme.

I've found that treating symptoms rather than cause is exhausting, frustrating, sometimes expensive and can have nasty, unintended side effects.

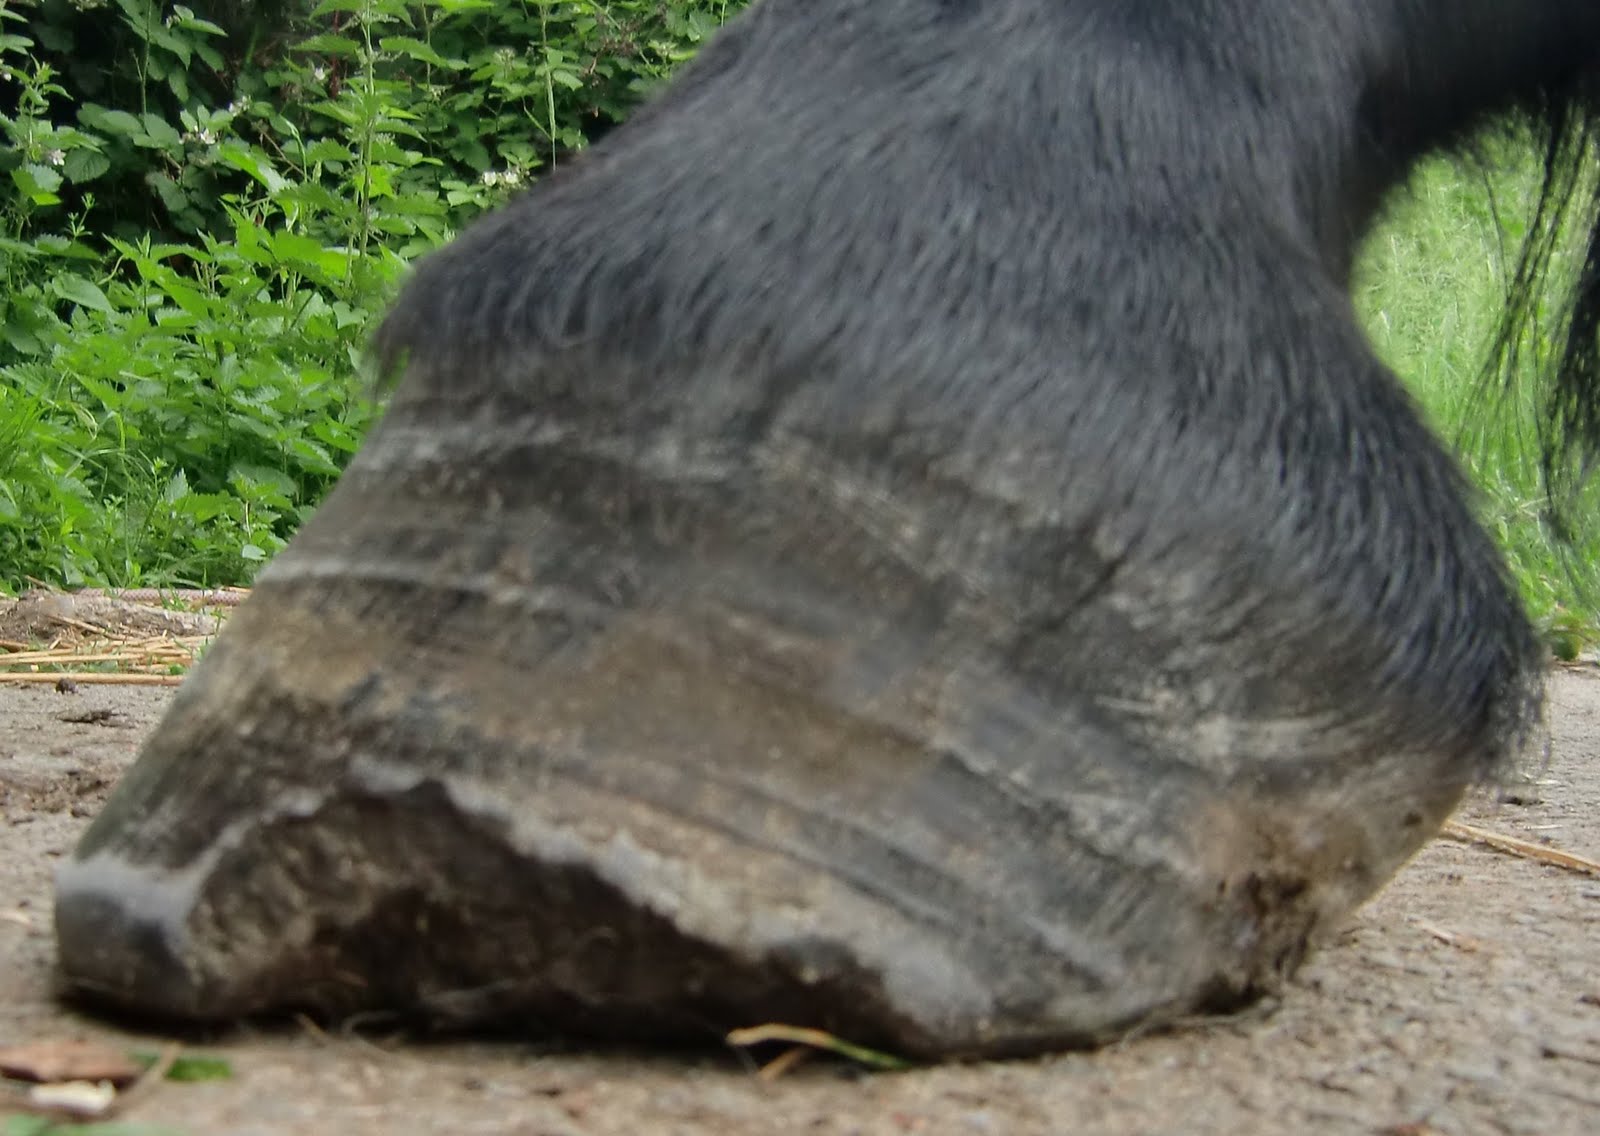
Hard working, naturally kept hooves generally have far less of a problem with Thrush which needs damp, anerobic environment to thrive.

A well kept hoof doesn't provide a happy home for Thrush. The solar surface of the hoof is relatively smooth, forming a natural bowl, making it harder for yuck to make a permanent residence. As the hoof works it flexes (helping to ease out any dirt) and the external structures get scoured by the mixture of soil, grit and the like that the horse travels over.

The frog, conditioned by working hard over a variety of terrain is tough, leathery, has few if any tatters and resists fungal/bacterial attack.

And of course there is no shoe for the Thrush to hide under and no stretched white line for it to nest in.

But if you do get Thrush then be prepared to attack it on two levels. The first being to sort out the management so you grow a healthier hoof and the second is to make the environment less suitable for fungal/bacterial infections.

I counsel against the common practice of using noxious products. If you wouldn't put it on your hair then think twice about putting it on a hoof, after all they are made of the same sort of stuff.

You could do worse than using salt water to scrub the hoof (daily), or use cider vinegar to change the PH (but it stings), again daily. If you have a very stubborn case or no patience and no problem with budget you could try Pete's Goo or maybe a White Lightening or CleanTrax treatment. (Personally I have found daily slooshing with salt water just as effective).

Wednesday 21 July 2010

Thrush, Thrush and more Thrush

Don't know what it is about this year, but I've never seen so much Thrush mid summer. Maybe it got really deep into the nooks and crannies of hooves in the long wet winter and has been lurking unseen. I think so far I've probably found it in 9/10 of the hooves I pick up.

Certainly I am finding it in otherwise well kept hooves, deep in the bottom of collateral grooves, tucked under the 'nose' of the apex of the frog, nicely covered by odd flaps of loose frog or perfectly protected under shoes. Owners are usually horrified because by and large they are pretty good at the routine foot picking etc.

I am also seeing Thrush a lot in horses kept on rubber mats and/or straw. Anything which is allowing the hooves to get damp with urine. Pee as we all know degrades keratin, leading to a softening of hoof walls and soles and leaving the white line and frog vulnerable to secondary infection.

So please for the sake of your horse do not treat Thrush as the trivial condition that the old texts (and old wives and some YM) would have you believe. It causes pain in the back of the foot. This pain can be minor and relatively unnoticed, or more extreme where the poor sore horse that has to land very toe first to avoid loading the back of the foot. (The horse may also stand with their front legs jacked back under the belly somewhat to avoid loading the heel. When they do this they can't use their stay apparatus properly.)

If you have a horse with heel pain you risk receiving a diagnosis of navicular, with all the associated anxiety and expense and possible fatal consequences.

This is so common it's gone beyond tragedy. However the discussion regarding navicular, it's existance, treatments and prognosis deserves a separate post (coming soon).

So, if you suspect Thrush, treat it (and it doesn't have to be black and smelly). So long as you use a suitable preparation you won't do any harm and you may well save yourself and your horse a lot of heartache and pain. Oh and keep the beds pee free and make sure your turnout is not a urine bath. If you can smell pee, then Houston we have a problem.

Friday 16 July 2010

How long does barefoot transition take?

Sometimes no time at all. But it does depend on the current health status of the horse and how well it has been managed from birth. The fastest transition I have seen was the length of time it took to take the shoes off the horse's feet (the horse has never faltered since.) The longest is two years and still going (this one will always need boots because the diet is not under control).

The hardest part of transition though is often the changes that need to be made by the main carer. If they are unable to move from traditional thinking and horse care to adoption of the whole DEET approach then the hooves may never transition successfully.


The above photos are 'pairs', they are of a particularly challenging case. The first in each pair is dated 27 04 10 and the second is 16 07 10. This foot was regarded as slow growing when shod.

In under three months at least a third of the hoof has been replaced, which is about average.

When deshod the soles were paper thin with shallow collateral grooves, no heels, lots of thrush, thin splitting walls, flares, white line separation, very little water line and a bull nose. Plus (I believe in an attempt to dress away the bull nose) the front of the hoof wall had been heavily rasped well above the bottom third of the hoof wall.

In the later photos, the sole is still thin, but not quite as bad, the collateral grooves are getting deeper, the water line is developing, as is a heel buttress and the white line separation is not quite so extensive. But this hoof is going to be a long time in recovery.

However this doesn't mean you have to stop riding your horse, but for it's health and protection hoof boots should be fitted for exercise until the sole is much more robust.

Hooves don't lie and the healing angle

Failure to understand the healing angle causes a lot of horses a lot of unnecessary grief*. Although in one sense it is a pretty simple, straight forward guide, because getting it right is so important I am not going to attempt to go into detail about it here. Much better to either get in an AANHCP trimmer or attend a course run by the training arm of the AANHCP.

But in short - hooves will grow at the correct angle within the context of that particular horse, if the horse is allowed to live optimally (this includes the whole DEET).

You can see the angle the hoof wants to grow at, near the top of the hoof, just below the coronary band. If this angle doesn't continue to the ground, something, somewhere is going wrong. And there is no arguing with this, hooves don't lie, they just do what they need to do. No matter how frustrating tracking down the problem is, no matter how 'perfect' the management being offered, if the healing angle can not be maintained then 'Houston we have a problem.'

*I am pretty sure that 'traditional' trimming does not acknowledge the healing angle - hence the fixation with wedges, caulks etc (which totally disrespect the healing angle).

Very subtle flare - can you see it?

My own horse's health is being compromised by the wrong sort of hay (long story for another day) - a situation I hope to correct very soon. But if you just took how she looked and performs overall you might never think there was any issue. (see first photo)


In the second photo you may be able to see the subtle deviation from the healing angle?


But when I mark it up, it is not so insignificant.


The hoof is providing several other clues that all is not 100%:-

Event lines
Rather flat sole
Stretched white line (at toe)
Still footy over stones

If she had shoes on I probably wouldn't have noticed any of these things and Grace could have continued suffering LGL for years until she had a major lami episode.

While we might be struggling (very hard to get the right sort of hay at the moment) at least we are aware that Grace's health is not as good as it could be and can take steps to ameliorate it.

Thursday 15 July 2010

Speed of growth (and hoof cracks)


This foot is trimmed at four weekly intervals. Each photo is four weeks apart. Therefore there are 12 weeks between the first photo and the last.

The crack in the hoof has grown out quickly with no fancy putty, packing, burning, clipping, dressings or gunk of any kind.

The horse has continued throughout with a normal workload (heavy by today's standards) and has been sound throughout.

Transition - it's a bit like gardening.........


Feed appropriately, trim as necessary and let it grow, let it grow, let it grow.

A work in progress, in the third photo you can see very clearly the difference between the healing angle and the basement. The paper thin sole is thickening up (slowly) ditto the crumbling walls.

Wednesday 14 July 2010

Lameness removing shoes a case study - 33 days


Thank you to the carer of this horse for generously allowing me to use the photos.

The first photo shows the hoof prior to being deshod on day one. The second photo is how the hoof looks 33 days later.

Notes

Horse is foot sore, but is making progress - sound in walk in the school

Hay is soaked for 12 hours and the horse is being fed a high quality general purpose mineral supplement.

Stabled during the day the horse is turned out in a grazing muzzle overnight

Exercise is 20 minutes or so at walk, in hand in a school

The horse's carer is working on their mustang roll technique

The healing angle is very healthy at approximately 52 degrees and is heading towards the ground nicely

The basement angle is approximately 39 degrees

The picture below shows the healing angle marked up in red and the basement in orange.

Sunday 11 July 2010

Shoe sizes


A big 'Thank you' to the owner of these shoes for allowing me to photograph them and use the picture on this blog.

These shoes were put on the same foot - the time interval just one shoeing. So one of them was taken off and the other nailed on immediately after.

I've seen hooves change shape really quickly - but never that fast - it usually takes at least a few days for a noticeable difference.

I obviously don't have the requisite magic rasp............

Monday 5 July 2010

Shoeing intervals


I have no doubt that some foot problems are caused by overly long shoeing/trimming intervals.

But I am not so sure that this can be the causal factor for all the foot problems I see in recently deshod hooves.

The foot above (not one I have worked on) is most likely to have had a fair amount of farrier attention judging by the nail holes and interesting shoe pad combo. It took a long time for the foot to get like that.

To be honest, I am wary of posting pictures like the ones above. But unfortunately I have met horses still living, attached to feet that are going in the same direction. So I post with the hope that maybe these pictures will serve as a timely warning and prevent such tragedy happening for someone and their horse.

Thursday 1 July 2010

Can't see the foot for the shoes

The feet below have all recently had the shoes removed.


I've removed the shoes from a fair few horses. A common theme is the poor health of the foot when the shoe comes off. I have yet to remove a shoe from a foot that has been in perfect condition.


The things we tend to find are:


  • terrible smell


  • thrush


  • white line separation


  • contracted heels


  • squishy contracted frog


  • thin sole


  • crumbling walls


  • laid over bars


  • shallow collateral grooves


  • really long walls

About Me

My photo
Southern England, United Kingdom